-

Matt (Admin) replied to the topic DIY Packraft Photos in the forum DIY Packrafts 5 years, 8 months ago
Great trip report! Thanks for posting!
-
Matt (Admin) wrote a new post 5 years, 9 months ago
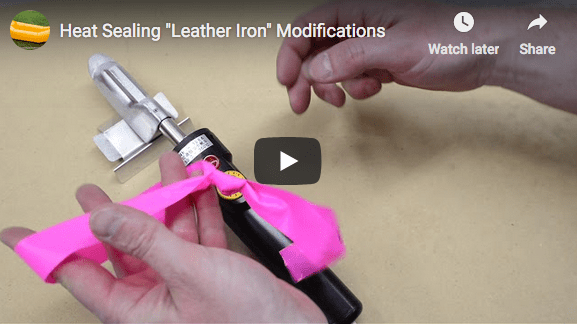
The “leather iron” from http://www.aliexpress.com is my preferred iron for assembling DIY Packraft kits. It’s hot enough, it maintains a consistent temperature, it’s robustly built, it’s the right width for heat sealing […]
-
Is there some benefit to replacing the plug as opposed to using an adaptor?
-
You can probably save a few dollars by buying a new plug instead of an adapter, but other than that, there’s no benefit. When I made the video the only adapter I could find was about $30, which seemed excessive, but since then I’ve seen them as low as $8, which makes that option more attractive.
-
-
-
Matt (Admin) replied to the topic 2 Chamber modification in the forum DIY Packrafts 5 years, 9 months ago
Hi David, the diameter is 275 mm. Cheers!
-
Matt (Admin) replied to the topic New users say "Hi" here to prove you are not a Spam Bot in the forum DIY Packrafts 5 years, 9 months ago
Very cool! Thanks for the tips, Christian!
-
Matt (Admin) replied to the topic New users say "Hi" here to prove you are not a Spam Bot in the forum DIY Packrafts 5 years, 9 months ago
Welcome! I haven’t done any high pressure testing, but yeah, I think it will depend on the factors you mentioned plus the design of the inflatable object and how the forces are distributed along the welds. Cheers!
-
Matt (Admin) replied to the topic How do you Heat Seal 2 Double Coated Fabrics? in the forum DIY Packrafts 5 years, 9 months ago
You could try that – I’ve heard that it works but I haven’t tried it myself.
-
Matt (Admin) replied to the topic 2 Chamber modification in the forum DIY Packrafts 5 years, 9 months ago
Hi David,
I think it’s worth trying – it’s one of those things I’ve been meaning to try for ages but haven’t got around to, myself. What I’m not sure about is the longevity of a glued joint on the inside of the tube fabric, and what’s the best adhesive to use. Some people have reported that a glue called HH-66 works well, but I can’t find it…[Read more]
-
Matt (Admin) replied to the topic How airtight are your boats? in the forum DIY Packrafts 5 years, 9 months ago
Hi Markus,
It sounds like the air is escaping through the zipper – a few small bubbles could add up to 1-2 breaths per hour, no? This could probably be resolved by cleaning the zipper and reapplying lubricant. If the zipper isn’t leaking and the seams are all sealed and the fabric isn’t damaged and there’s no dirt in the Boston valve or top-up…[Read more]
-
Matt (Admin) replied to the topic bowl for curved surface in the forum DIY Packrafts 5 years, 9 months ago
Done!
-
Matt (Admin) replied to the topic DIY Packraft Photos in the forum DIY Packrafts 5 years, 9 months ago
Hahaha!
Good looking fish!
-
Matt (Admin) replied to the topic DIY Packraft Photos in the forum DIY Packrafts 5 years, 9 months ago
Gorgeous shot!
-
Matt (Admin) replied to the topic Modify Therma-Rest pad for an inflatable floor. in the forum DIY Packrafts 5 years, 10 months ago
Great idea, Bruce! It’s amazing you were able to remove the foam and reseal where it had been. Thanks for sharing!
-
Matt (Admin) replied to the topic DIY Packraft Photos in the forum DIY Packrafts 5 years, 10 months ago
Beautiful!
-
Matt (Admin) replied to the topic Long Top Off Tubes in the forum DIY Packrafts 5 years, 10 months ago
Yep, you just have to cut the black tube and insert some flexible tubing (or rigid tubing pieces that you can then attach flexible tubing to). You can get clear PVC tubing at most hardware stores, and that should work well enough for float bags. Cheers!
-
Matt (Admin) replied to the topic TPU heat damage and repair? in the forum DIY Packrafts 5 years, 10 months ago
Yes, I’ll help you out if that’s what you prefer – just send me a message through the Contact form.
-
Matt (Admin) replied to the topic Colorado River In Glen Canyon On My V3 in the forum DIY Packrafts 5 years, 10 months ago
Fantastic! Beautiful pictures and great trip report! And thanks for the valuable feedback. Cheers!
-
Matt (Admin) replied to the topic Heat-sealing tools in the forum DIY Packrafts 5 years, 10 months ago
The iron I’ve been using lately is the leather iron from Alibaba.com. It requires some modification, but it’s better than the Black Baron because it’s narrower (more info here: https://www.diypackraft.com/construction/tools/ ). I see they’re also selling them on Amazon now too:…[Read more]
-
Matt (Admin) replied to the topic TPU heat damage and repair? in the forum DIY Packrafts 5 years, 10 months ago
By the looks of it, it’s probably not still airtight, so I would heat seal some scrap yellow fabric over the damaged areas, and then add some Seam Grip or Aquaseal along the edge between the patch and the black fabric, if necessary.
-
Matt (Admin) wrote a new post 5 years, 10 months ago
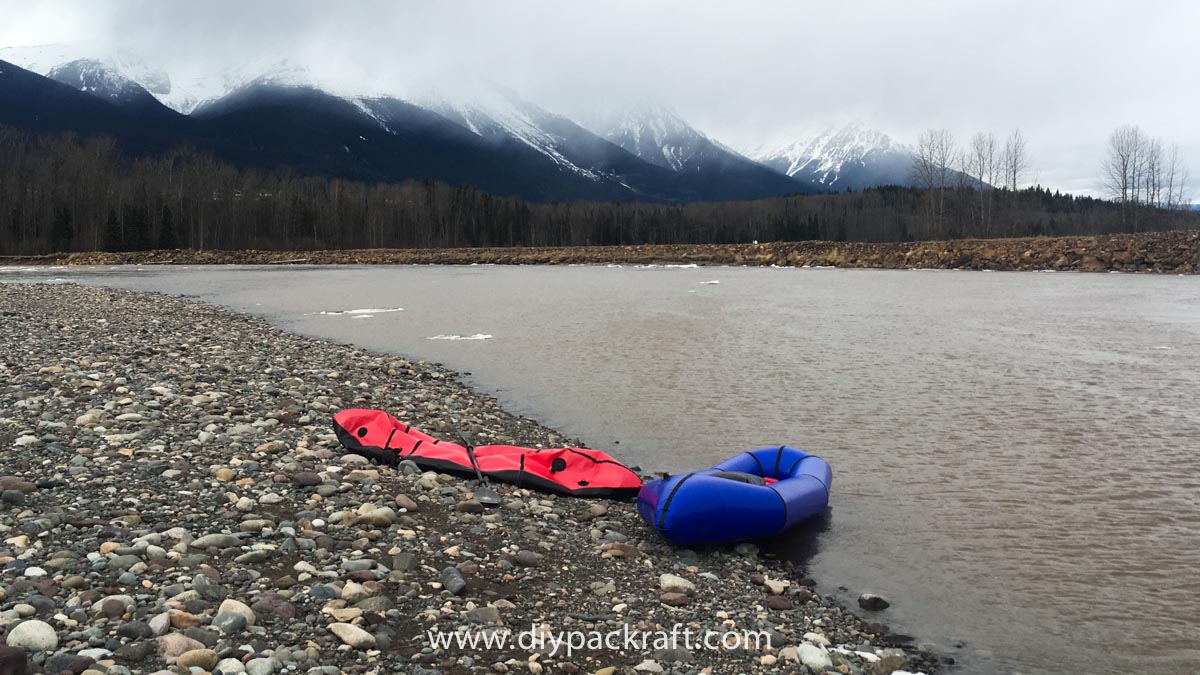
Last weekend the ice on my local river had opened up enough for me to go paddling, so I spent an hour navigating some Class 1 water while dodging ice rafts in the new 1-person packraft with the wrap-around floor. […]
-
I haven’t calculated it yet, but it should be comparable to the V3 plus a bit for some extra things that will be included that the V3 kit doesn’t have.
-
Hi Matt,
Any chance we can get the new design, but without the wrap around floor? I’d want beefier fabrics than the ultralight kit (210D tubes, 410D floors), but would like the ease of construction and improved paddling speed compared to the V3. I’m not sure the type of water I’m in warrants the wrap around floor.
Thanks,
Joe-
Hi Joe, yeah, I’ll likely do a regular version of a similar design – not sure when I’ll be able to get to it. It’s good to know people are interested though!
-
-
-
Matt (Admin) wrote a new post 5 years, 11 months ago
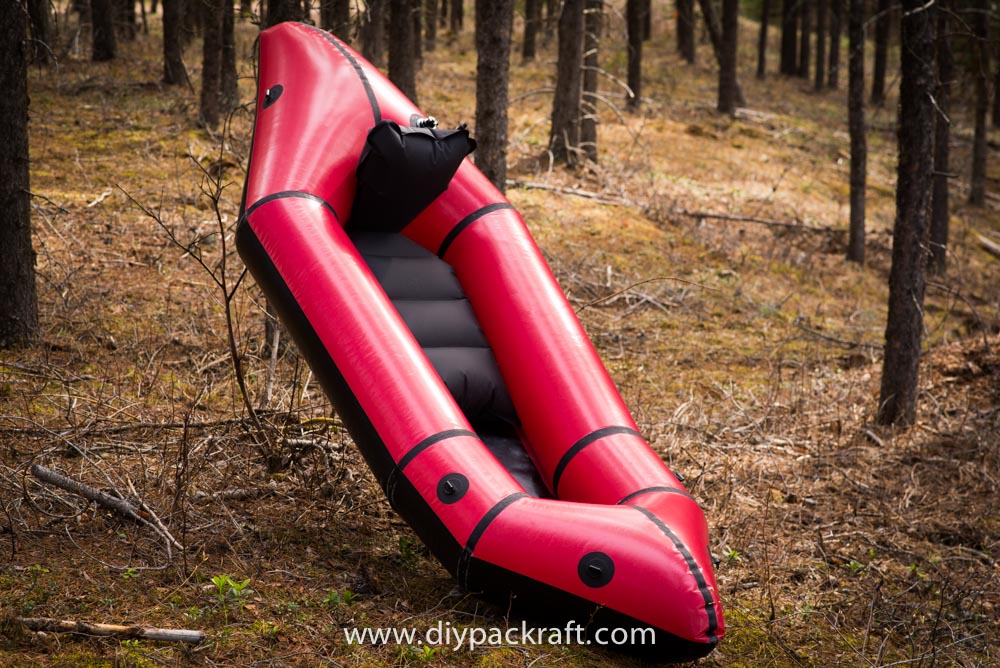
Notice anything unusual about this packraft?
2.278 kg, or 5.0 lbs
The tough floor fabric wraps halfway up the tubes to make this DIY Packraft extra tough where it counts, and it’s still […]
-
Hi Dan, I’m going to paddle it and the new 2-person packraft for the first time this weekend, and if all goes well I hope to have kits available later this month. No guarantees though!
-
Hi Nick, I’ll be testing out a seat for this packraft this weekend – I suspect it might need a bit more work, but yes, I hope to have it in the shop soon. Cheers!
-
Yep, you’re right – it’s got a higher volume bow and stern.
-
No, there’s nothing about the V3 design that precludes a wrap-around bottom, but I don’t intend to offer it as an option.
-
Hi Christian, thanks for your interest! It depends on the type of paddling you want to do, but if weight isn’t your main concern, personally I would choose the new model. Aside from the design updates, the instructions will be easier to follow. It’ll be in the shop quite soon. Cheers!
-
I don’t foresee any issues with the seat back interfering with a spray deck – just place the cockpit coaming back far enough so the seat back doesn’t push against it. Thigh straps shouldn’t be a problem either. If you don’t like the seat you can cut off the seat back and just make a flat seat instead and add a back band or something else (or just cut the seat back shorter). If you get an extra top-up valve (or repurpose the one intended for the packraft) you could turn the seat back into an inflatable foot rest or a pillow to go between your knees. There are lots of possibilities. Cheers!
-
I haven’t designed one yet, but it’s certainly possible!
-
Yeah, I’ll probably make a video of the new packrafts after I finish all the instructions.
-
I see you found it 😀
-
Yup waiting eagerly for it to arrive now!
-
I’m really interested in this design for a couple river (moderate whitewater) trips. Do you have the interior width (front and rear, since it clearly tapers)? I’m looking at the two smallest sizes. Shifting weight forward for better weight balance (fore/aft) is a pretty standard packraft design (the included seat design does that to some extent), and I’m wondering if I will get a good fit width wise if I go that route.
-
The interior width tapers from 37 cm (14.5″) to 21 cm (8.25″) in all three sizes. It’s designed to fit snugly around your hips, and being inflatable, it can stretch to accommodate wider bodies. Cheers!
-
-
I purchased a Telkwa kit from Matt in late June and finished it in early August. Building it was much like the V3 I built last January. However, there are a few key differences and so you should certainly review Matt’s updated Telkwa build videos to avoid some of the mistakes I made. Probably the biggest difference is that now Matt recommends using the “inside out” construction technique. I used that and found that it does aid in better access to the weld areas. On the down side, it also works the material pretty hard and there are touch up welds or seam grip “repairs” needed if you don’t take lots of care to get your welds right the first time. A person could still build the Telkwa using the V3 method as an alternative if so wished. I purchased my Telkwa kit with the zipper which definitely aided in the construction, especially in closing the aft seam.
I feel like the cockpit is just a bit narrower than the V3 as is the foot compartment. Still, there is room for me in the 130cm size.
The new seat design is fantastic with the pillow back. However, I definitely recommend sealing the seat separate from the seat back because while sitting on a partially inflated seat, my body weight pushed all the air into the back which left me with no air in the seat bottom. After I ironed the neck closed, I added a top off valve to the seat back. I put more air into the seat back and that gives great back support. Less air in the seat keeps my center of gravity lower in the boat but still keeps my butt off the floor.
I have taken my Telkwa on the middle Yellowstone River several times now, riffles only, maybe a possible low-end class 1 rapid. The Telkwa tracks much better in the water than the V3 does because of the more stream lined bow. I always add about 25# (12 kilos) to the front to keep it level in the water (a big, rounded rock has been used in the bow compartment a time or two, as well). I’m really pleased with how it handles. I have hit a few “butt dragger” shallows and had no fear of the bottom opening up. The extended floor up the side walls of the tubes gives me a bit more secure feeling should I scrape a log or rock although I have not done that and really try to keep from doing that.
My Telkwa weighs within an ounce or two of the V3 and pumps up with the same number of strokes from my small piston pump. My boating friends are amazed that I have built my own boats and are envious of the light weight when hauling gear back to the car shuttle or when hiking to a mountain lake (V3).
-
- Load More