This page shows several different ways of making attachment points (“tie-downs”) so you can attach your seat, backpack, grab lines, and other gear to your packraft. Some of these attachment points are pre-scored into the fabric in your packraft kit. You can also make more from the extra fabric that is included with every DIY Packraft kit.
Tip: If you’ve added an airtight zipper to your packraft for storing gear inside the tubes, it’s a good idea to add attachment points inside the packraft so your gear won’t move around too much in whitewater and when you lift the packraft onto the beach. You can heat seal Type 1 or Type 2 attachment points where the floor fabric is exposed inside the tubes. Add a short loop of paracord to the attachment point so it’s easy to secure your gear with a carabiner.
Attachment Point Type 1:
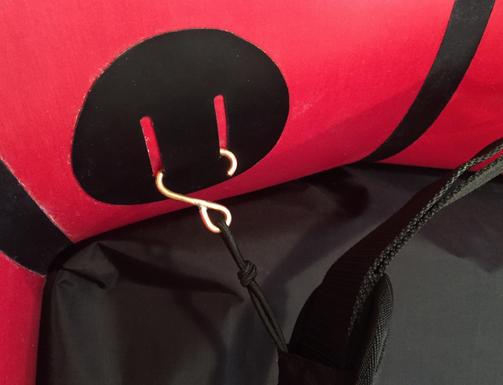
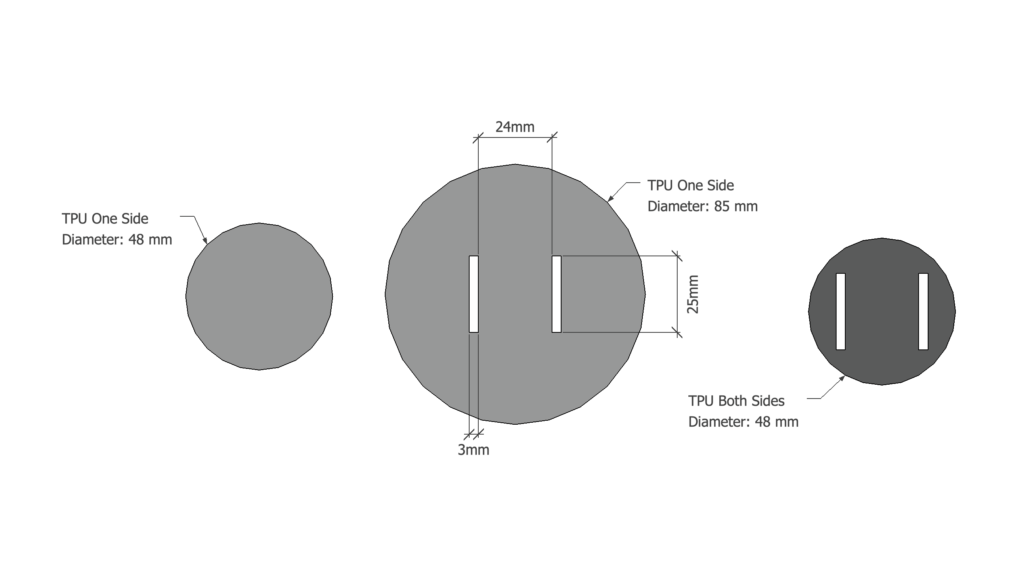
Bruce Campbell from Fairbanks came up with this simple but strong design, made from two layers of fabric with parallel slots cut in them. You can slide webbing or hardware through the slots to attach your gear.
Attachment Point Type 2:
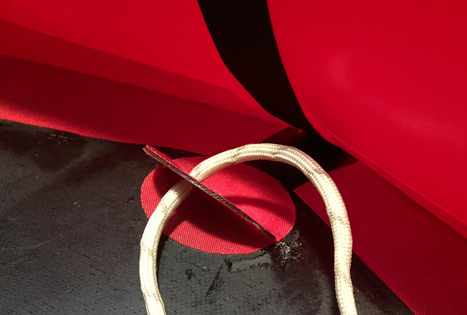
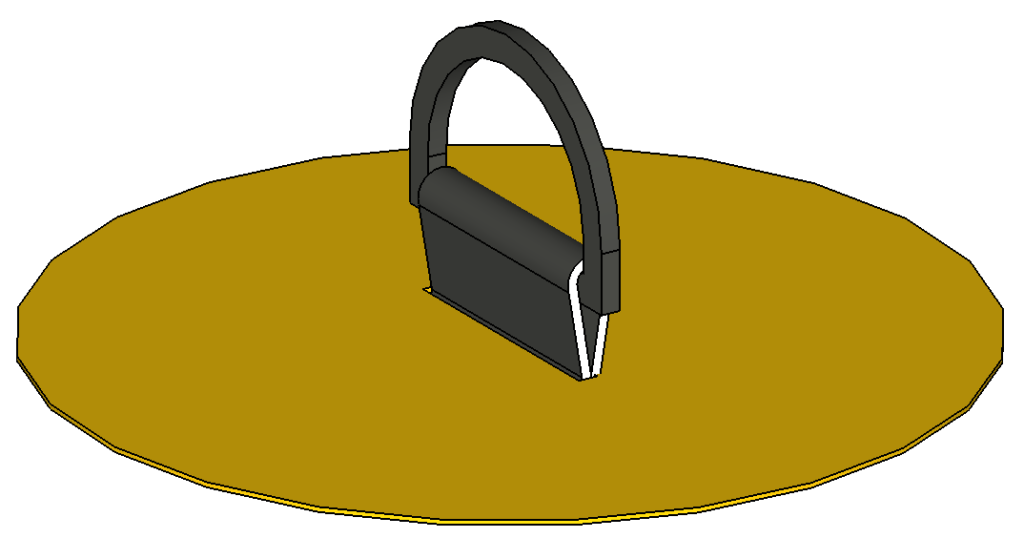
This ingeniously simple design (posted by Mark in the forum) is made from two circles of tube fabric and one semicircle of scrap floor fabric (with TPU on both sides). The semicircle is heat-sealed between the two circles, and then the free halves of the circles are sealed to the packraft. A hole is cut through the three fabric layers and voila, you have a sturdy attachment point. (Because it will swing around the fold like it’s on a hinge, it’s best to orient the fold perpendicular to the expected force.)
Attachment Point Type 3:
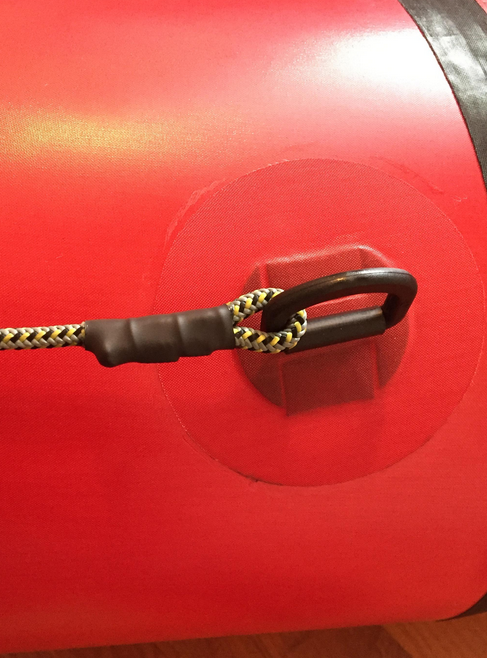
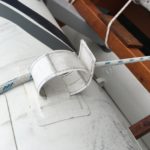
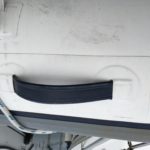
The design can also be modified to use buckles instead of D-rings, or to make different loops and handles similar to these examples seen on an inflatable dinghy:
Here’s how I make them:
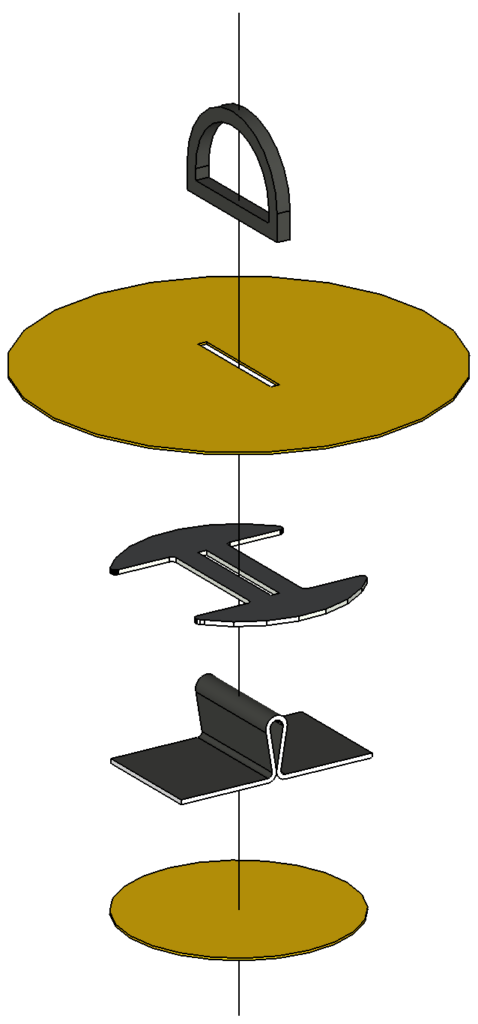
The exploded view above shows, from top to bottom:
- A 25 mm (1″) plastic D-ring. (The D-Ring is optional – you could just extend the strip so it forms a loop that’s large enough to tie to, but the D-ring reduces friction and distributes tension more evenly.)
- A circle of 250 GSM fabric, TPU side down. (As of 2021, these are black and are scored into the same piece jof fabric as the seat parts.) This holds everything together and attaches to the packraft’s tube fabric by heat sealing.
- A roughly H-shaped piece of floor fabric (with TPU on both sides). This reinforces the tie-down, making it very strong. (These are pre-scored in the scrap floor fabric.)
- A strip of scrap floor fabric, which is inserted through the D-ring, folded in half, and then inserted through the slots in the two layers of fabric above. These heavier fabrics are similar to webbing. (These pieces are not pre-cut – just cut a strip of scrap floor fabric.)
- A smaller circle of tube fabric, TPU side up, completes the sandwich. (This circle is scored into the colored tube fabric.)
When all the pieces are heat sealed together, it creates a very strong tie-down that can be pulled in all directions without tearing, and it only weighs about 5 grams. The larger circle of fabric overhangs the other components, TPU side down, and can be heat sealed directly to the packraft’s tube fabric.
Here are the dimensions of each piece (the slots cut in the fabric are 2 mm wide):
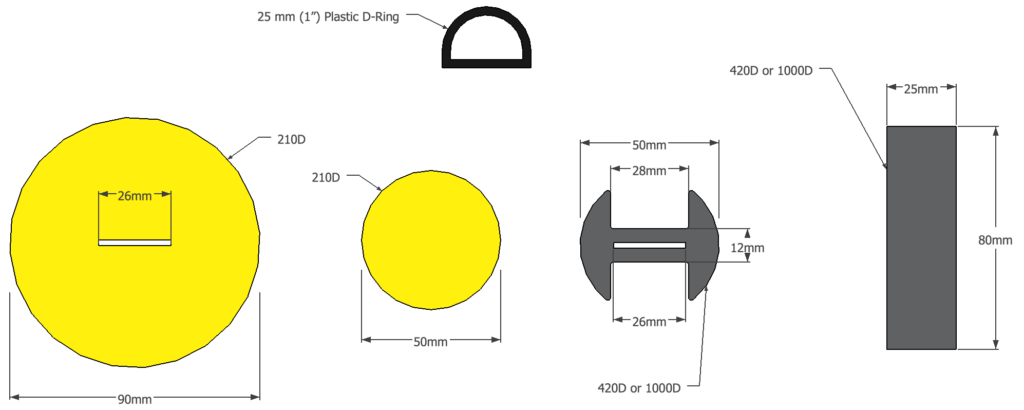
Click here for a PDF template that you can print and cut out. (Not exactly to scale, but close enough.)
At some point I’ll do a test to see just how strong the tie-downs are, but I’m not strong enough to break them by pulling at any angle.
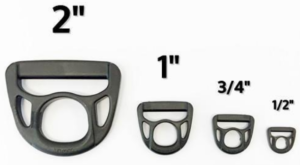
Plastic D-rings are surprisingly strong, but you can use metal if you want. Steel will rust though and it’s relatively heavy, and titanium D-rings tend to have sharper edges that could wear through the loop or your gear. I haven’t found any 1″ aluminum D-rings, but that could also be an option. Thanks to Ron S. for alerting me to these extra strong “Beastee Dee” plastic D-rings:
Attachment Point Type 4:
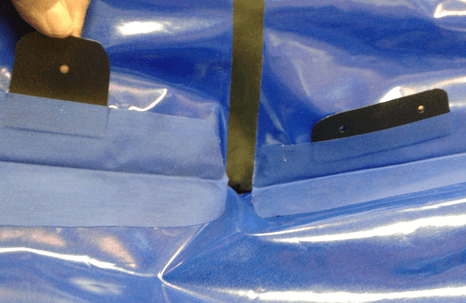
This is another great idea from Bruce in Fairbanks – a simple tab of scrap floor fabric heat sealed between the tube fabric and the edge of the tube-to-floor reinforcing strip (alternatively, you could place it between the reinforcing strip and the floor). Bruce writes, “Punch holes in the tab, I used a leather punch, and short pieces of parachute cord to tie in your seat. (I punch matching holes in my seat, which I built with a 15 mm strip of floor fabric in the edge seam.)”
Attachment Point Type 5:
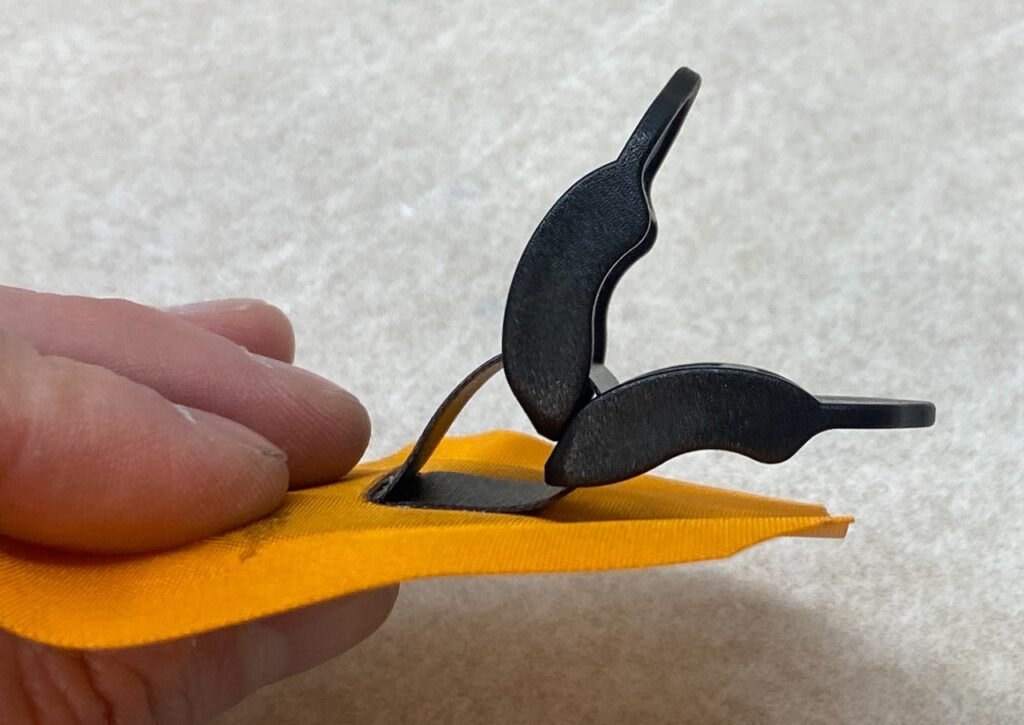
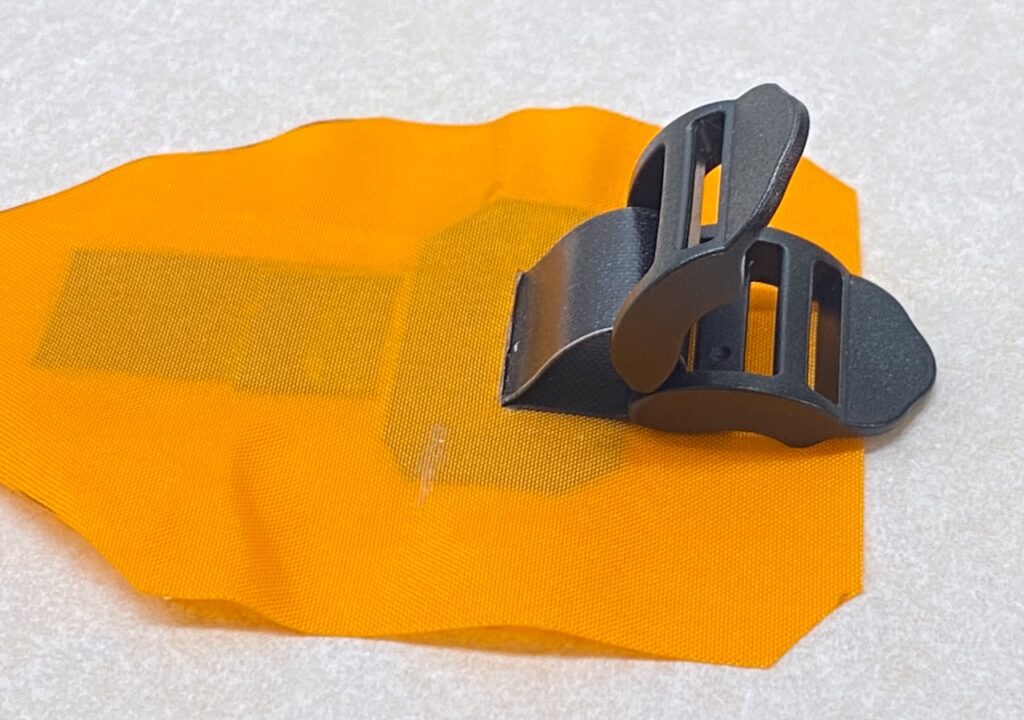
These ladder lock attachment points are very strong, but only in one direction, so they’re best for things like backbands.
Attachment Point Type 6: Dual Ladder Locks for Seat & Backrest

21 Comments
Daniel · May 1, 2023 at 4:53 pm
Hi! I’m on the add-ons portion of my raft, and am figuring out attaching thigh straps to the raft. I see most of the content on your forums use a ladder type attachment point above the thigh/knee area. Do you have any recommendations for measurements for these, or does everyone just hipshot them. It looks like the spacing between slots needs to be pretty specific for some hardware.
Thank you for the help!
Matt (Admin) · May 1, 2023 at 9:55 pm
I think in general people use the ladder type attachment points there so the strap position is more adjustable, both so you don’t have to get the location perfect on the first try, and also so it can be adjusted fore and aft to fit different people. To figure out the best position, I would recommend finding the location you think will work best by sitting in the packraft while it’s in the water and holding the strap in place (doing it on land won’t account for the floor sagging in water). The best size and spacing for the slots may depend on the strap and/or hardware you intend to use, but a 2.5 cm (1”) slot and spacing will probably work out.
Daniel · April 9, 2023 at 3:12 pm
Hi! I’m adding attachment point to the Telkwa kit I bought from you, and I see that you recommend type 1 or 2 points inside the raft. I was wondering why this is recommended, and I watched a video “pimp my packraft” that another referenced that cautioned being mindful of creating entrapment issues on the outside of the packraft. I like the type 3 attachment points for inside, and type 1 for the outside for minimum hookable objects but I was wondering if you thought that would be a bad idea. Thank you for your input and thanks for the kit! It’s been so fun.
Matt (Admin) · April 9, 2023 at 6:33 pm
I can’t think of any reason why you shouldn’t do that – the only reason I recommended the type 1 or 2 for use inside the tubes is that they’re quicker and easier to make. I think Type 3 has a bit more of a polished look, which is why I use those on the outside of the packrafts, but that’s just a matter of personal preference.
Henk · May 20, 2022 at 6:25 pm
Hi Matt, where should I place the internal tie down points on my Telkwa? I am not sure where the best position would be for accessibility or even where one should pack ones gear. Thanks
Matt (Admin) · May 21, 2022 at 10:40 am
Placing the weight forward will improve the handling characteristics in most circumstances. I would add a few attachment points throughout the tubes so you can experiment with gear placement and accommodate different items on different trips. Locate them where they will be near the bottom of the tubes when the packraft is inflated (near where the narrow ends of the tubes attach to the floor). Access is no problem because with the packraft deflated you can easily reach in to any point inside it.
In case people are wondering, attachment points inside the tubes are helpful in significant whitewater where a capsize is likely, and also when you lift/carry your packraft with gear inside it – in regular paddling they aren’t necessary.
LaylaLou11 · September 10, 2020 at 1:38 pm
Do you think an attachment point would still be strong if I peeled it off, rotated it so the D ring was oriented differently, and welded it back to the same spot? I did some of the D rings for my perimeter line horizontally instead of vertical and think vertical would be better long term.
Matt (Admin) · September 10, 2020 at 2:45 pm
It might be possible, but I think it’s just as likely you’d remove the TPU from the tube fabric, and if that happens you wouldn’t be able to weld the attachment point back on, so I probably wouldn’t risk it unless it’s really becoming a problem. On the other hand, you could try it and if it doesn’t work, just make new attachment points with wider diameter circles so they completely cover the area that got messed up.
Mitchell Everly · July 2, 2019 at 12:56 pm
Question about attaching tie-points (and outfitting in general). I’m currently getting to the end of my V3 build, with just tube sections 1 and 5 left to do (and then the center seams on each end). As I near closing up the packraft for good (I don’t have a zipper), I’m concerned about the fact that I’m losing access to the inside of the fabric. When is the best time to attach a Type 3 tie-point? Should I measure the location and attach them before sealing the center seams? What if I decide to add more later, such as attachment strips for thigh straps or back bands? Luc Mehl’s article “Pimp My Packraft” explains how to glue tie-points after the raft is completed. Once I seal it, do I have to use glue for future tie points? I’m just concerned about the finality of sealing up that center seam and then realizing I should’ve done something else before I closed it. The answer to these questions would I think be good information to include in the above article or the “Tie-Down Location Guide”. Thanks!
Matt (Admin) · July 2, 2019 at 1:05 pm
Good question. I have found that sealing just the perimeter of the Type-3 attachment points to the tubes is more than strong enough, and you can do that without access to the inside of the packraft (as in the video at the top of this page). You can also do it with the packraft inflated so you don’t have to worry about damaging the TPU on the fabric underneath the area you’re ironing – that’s my preferred method now. Cheers!
Ken · September 13, 2019 at 2:49 pm
Matt, when you install the attachment points with the raft inflated are you using the iron or Seam Grip? If using the iron it would seem there is a big probability of melting the surrounding TPU outside the attachment point material and that it would be more difficult to keep parchment paper aligned around the attachment point while inflated.
Matt (Admin) · September 14, 2019 at 10:18 am
Hi Ken, I just tape the attachment point in place and then use the curved tip of the leather iron to carefully iron it without parchment paper, but you could tape a parchment paper ring around it too. As long as the iron is hot enough, it works quite well.
Nele · April 10, 2019 at 6:32 am
Could I make Typpe 3 without a piece with TPU on both sides? Adding some glue at some point.
I have a V2 and only one-sided tpu fabric.
I have my doubt about the type one. ALthough they are nice and easy and the only ones I can make. But I can’t find photo’s of people using this type to tie down there backpack…
No experience here… and I know you said they should do fine.
Matt (Admin) · April 10, 2019 at 8:06 am
It might work – first make one and test its strength before attaching them to your packraft.
Nele · April 4, 2019 at 1:51 am
Hi there!
If I make Type 1 attachment points, which way should I place them if they come in position 1 and 2A?
Any suggestions?
Matt (Admin) · April 4, 2019 at 8:40 am
I would probably orient the slits vertically if you’re planning on adding a perimeter grab line between them, and that should still be fine for tying a pack to them. Cheers!
Nele · April 5, 2019 at 3:49 pm
Makes sense. Thank you!
Bruce · February 28, 2019 at 11:20 am
Another great video clip! I especially like the use of parchment paper! I’ll definitely incorporate this in future attachment points!
Thanks,
Bruce
Paul L. · August 7, 2018 at 3:26 pm
Re: Attachment Point Type 3; I am currently in “pre-production” of my V3. After making my inflation bag and waiting for the glue to cure on my seat nozzle, I wanted some more practice with the iron – so I started making attachment points (Type 3). It may be obvious to most, but I have found the easiest way to do these is to bond 1/2 of the sandwiched layers (leaving 1/2 of the strip of 420D or 1000D fabric “free” through the top of the sandwich), then put a d-ring on and feed the remaining 1/2 of the strip back through the top and bond the remaining 1/2 of the attachment point sandwich. This is easier to manage and made a cleaner looking and more consistent attachment…
Nick · November 22, 2016 at 2:29 am
Great that you are making use of the scrap material for this – thanks for the video, just what I wanted to see
Matt (Admin) · November 22, 2016 at 8:24 am
Great! I’m glad you found it useful!